
Weaving 101: A Basics Tutorial for the Beginner
Have you ever seen weaving and wondered how to get started or wanted to try your hand at it? Well, we have a great treat for you! Jelica of A Pretty Fix and Loom and Fibre (you can see her interview here to find out more about her) has created a wonderful, detailed, beginners tutorial for you on the basics of weaving. She walks you through each step and shows you what to do in both pictures and words :). What an awesome journey you’re about to start in creating a stunning piece of artwork! I can’t wait to see what you create!
Note - This post contains affiliate links, which means I will make a commission at no extra cost to you, should you click through and make a purchase. As an Amazon Associate I earn from qualifying purchases.
Weaving 101: A Basics Tutorial for the Beginner
If you’ve been loving the weaving trend, but just don’t know where to begin, you’ll love this weaving basics tutorial.
If there is any new handcraft to learn this season, let it be weaving! It’s one of those modern trends with a long history across many cultures around the globe - and for good reason. It is a craft with endless practical and beautiful applications from home decor - think coasters, table runners or rugs - to fashion - scarves are my personal favorite.
For those who’ve been following me on my blog “A Pretty Fix” or my Etsy Shop “Loom & Fibre”, you know that my favourite application is decorative wall weavings. They add a unique touch to any space, particularly if you don’t wish to hang yet another framed photo on the wall and are looking to be inventive with your decor.
In the following tutorial, we will be covering the foundations of creating your first wall weaving, from start to finish. It will include:
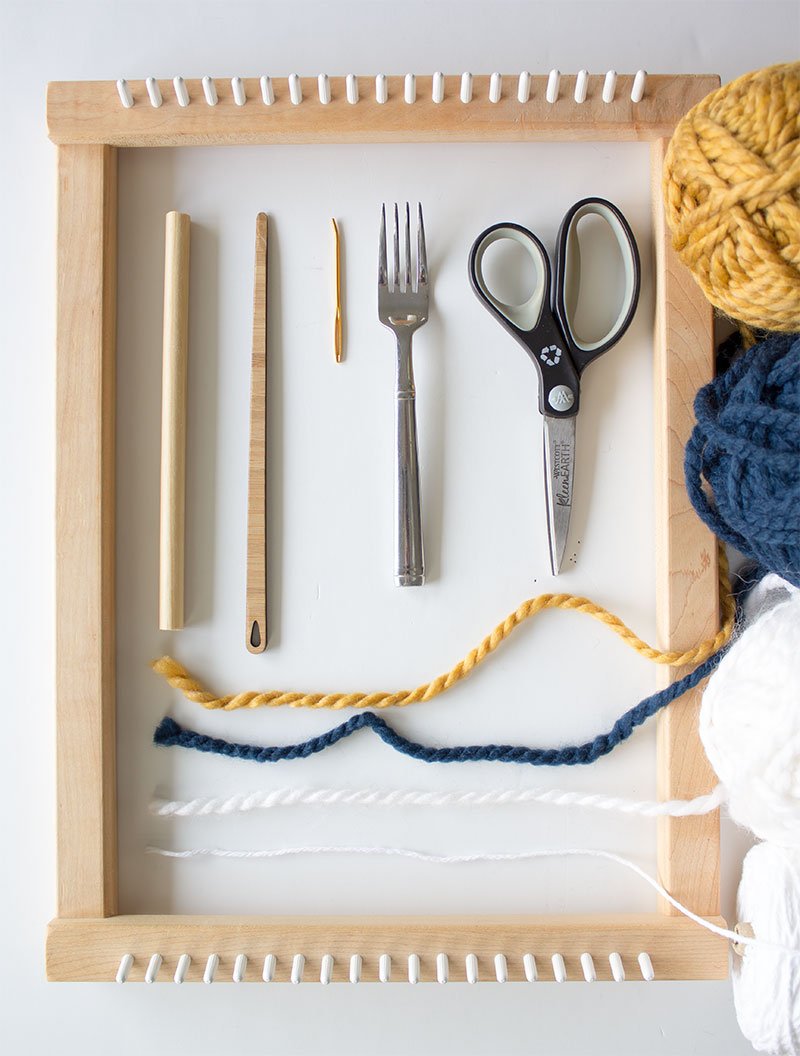
1. Materials you will need & where to find them.
2. Weaving terms you should become familiar with.
3. Three basic weaving techniques to get you started.
4. How to finish your weaving and attach to a dowel.
MATERIALS NEEDED & WEAVING TERMS YOU SHOULD KNOW
● Lap loom: The loom is the actual device you use to help you weave. A ‘lap loom’ simply denotes its size – it quite literally fits on your lap.
● Cotton yarn: The cotton yarn is used to create the “warp.” (warp: the vertical strings which comprise the foundation of the weaving).
● Yarn: to create the “weft” (weft: the material that is woven horizontally across the “warp”)
● Tapestry needle (long): The needle is used to weave horizontal rows of yarn across your warp.
● Tapestry needle (short with bent tip): about 3 inches long with a dull end and large eye used typically for thinner yarn and to weave in stray yarn at the end of your project.
● Scissors
● Wood dowel to hang your wall weaving. About 3-4 inches wider than your weaving (approx 0.25-0.5 thick works well for small weavings, like the one you’ll be creating in this tutorial).
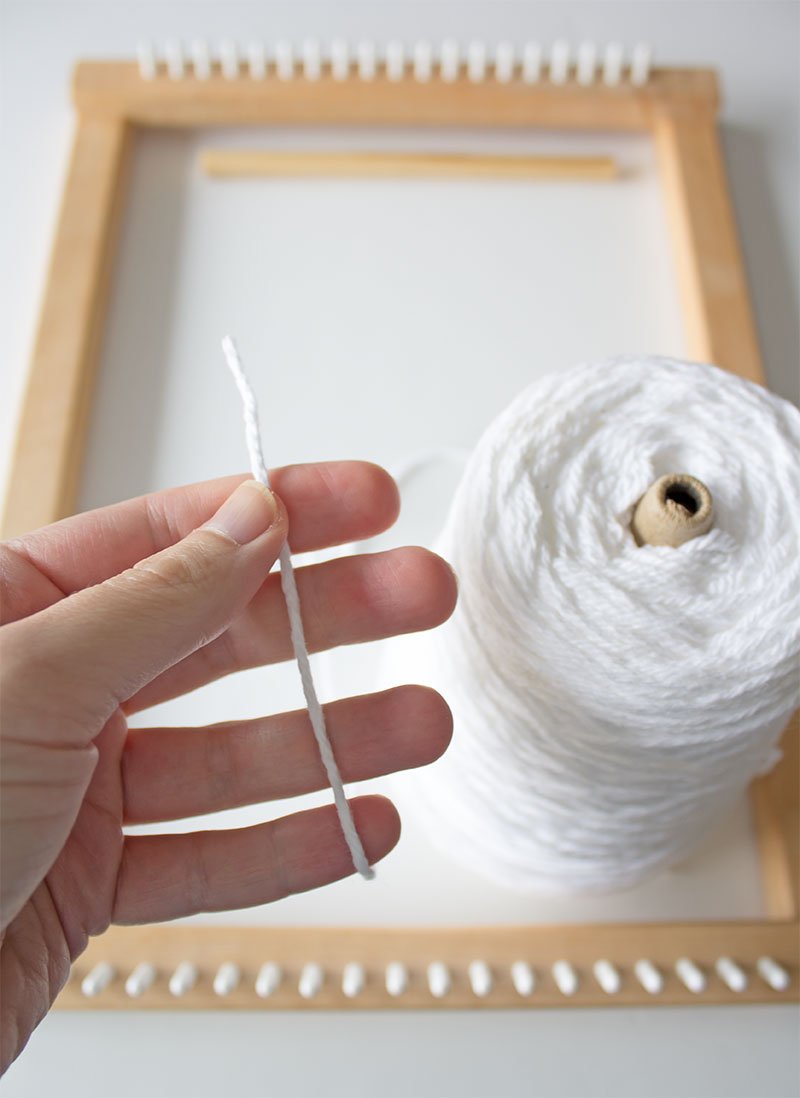
STEP 1: CREATING YOUR ‘WARP’ OR FOUNDATION
Tie an overhand loop knot (pictured below).

Place the loop over one of the pegs along the bottom.

Pull up and loop around the corresponding peg at the top, from left to right.

Pull down and loop around the second peg, from left to right, and continue upwards as before.

Continue this way until you have the sufficient width you need, making sure to end up at the bottom of the loom. Cut the cotton string, leaving an extra long tail.

Tie the remaining tail to the bottom end of the loom - between two pegs.

The reason? This will ensure that the width of the warp along the top and bottom are the same. Your loom may be slightly different, so be sure to measure the top and bottom of your warp width before tying it to your loom.

Trim off the excess cotton string.

Note: When creating your warp, make sure there is enough tension in your vertical strings. One way to test the tension is to make sure the warp springs back easily after you press down on it with your hand.

STEP 2: CREATE ‘ANCHOR’ ROWS OF WEAVING
Before starting your woven design, you will first create what I call the ‘anchor’ rows of weaving - 4 rows at minimum - using the cotton warp string. These rows will create an ‘anchor’ that will essentially hold up your weaving, once you remove it from the loom.
To start, measure approximately 4 rows of cotton string (with plenty left over).

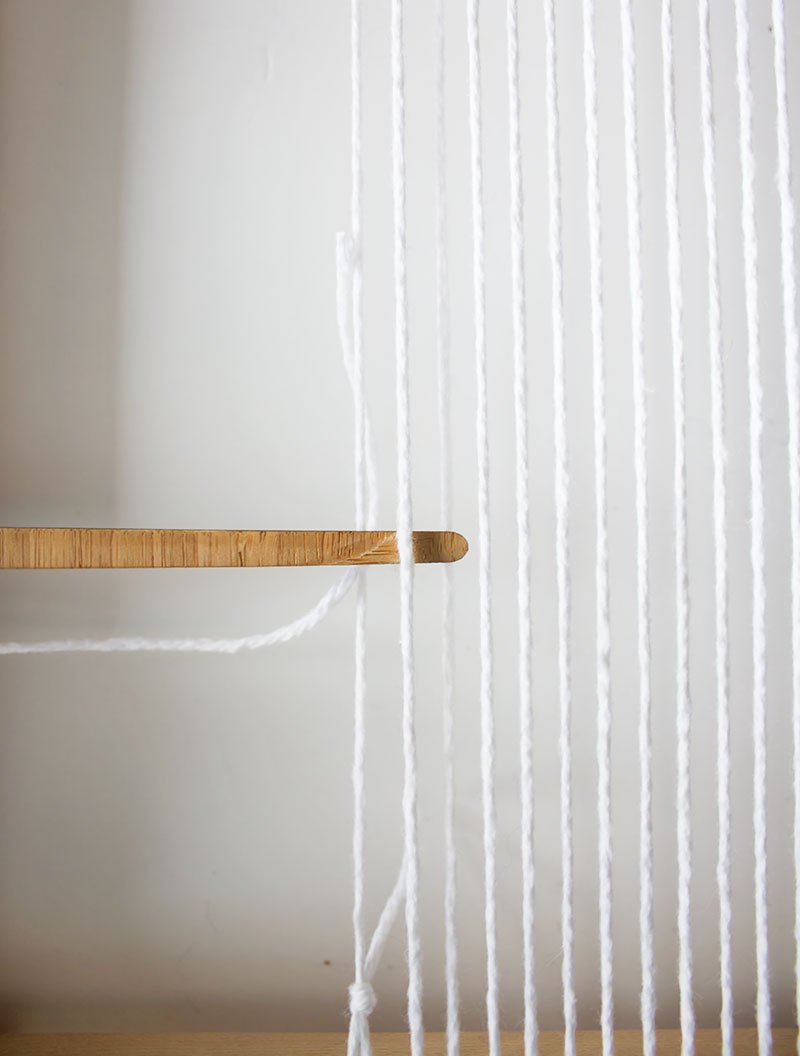
Tie one end to the first warp string to the left-most warp string (and approximately 4-5 inches from the bottom of the loom). Leave at least 3-4 inches of tail.

Thread your long tapestry needle. I like to tie it to the needle to prevent the string from slipping off as I weave.
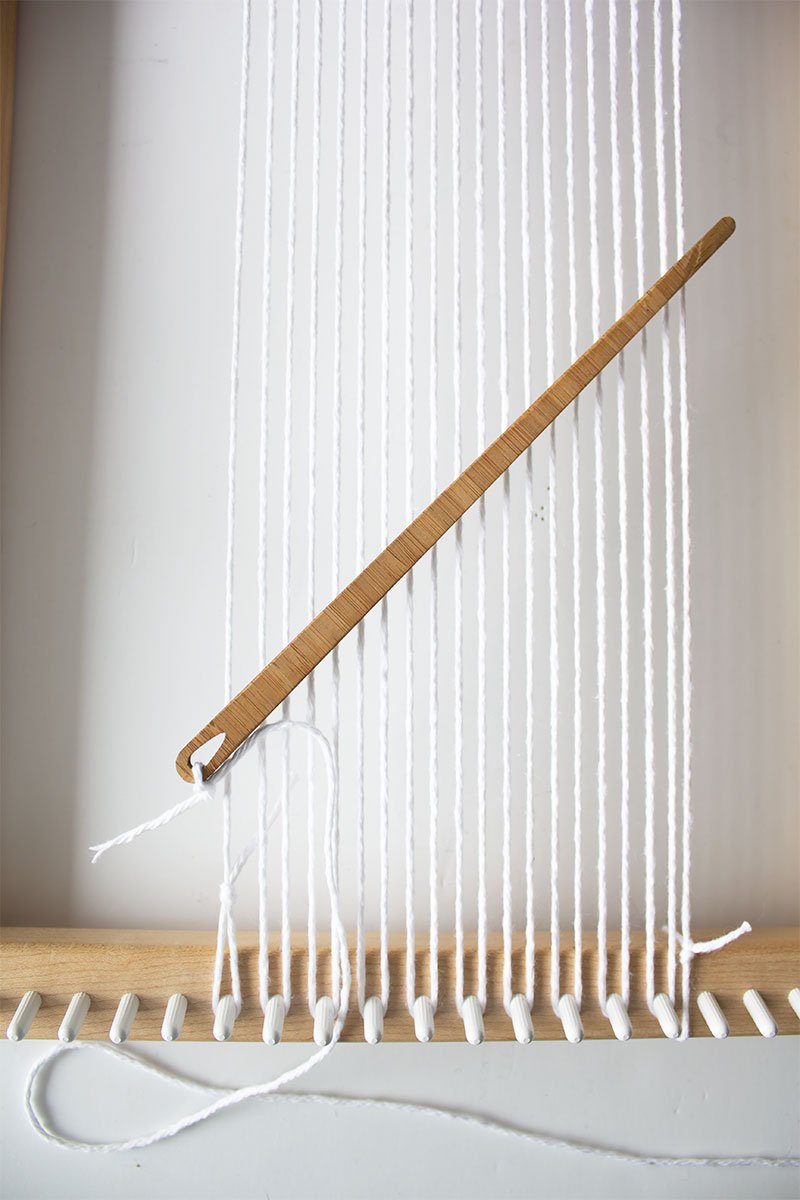
Begin weaving the first row of ‘anchor’ weaving: Feed the pointed end of your tapestry needle through the warp strings, going over the first string, then under the second string.
Continue alternating strings, going over and under, until you reach the end of your warp.
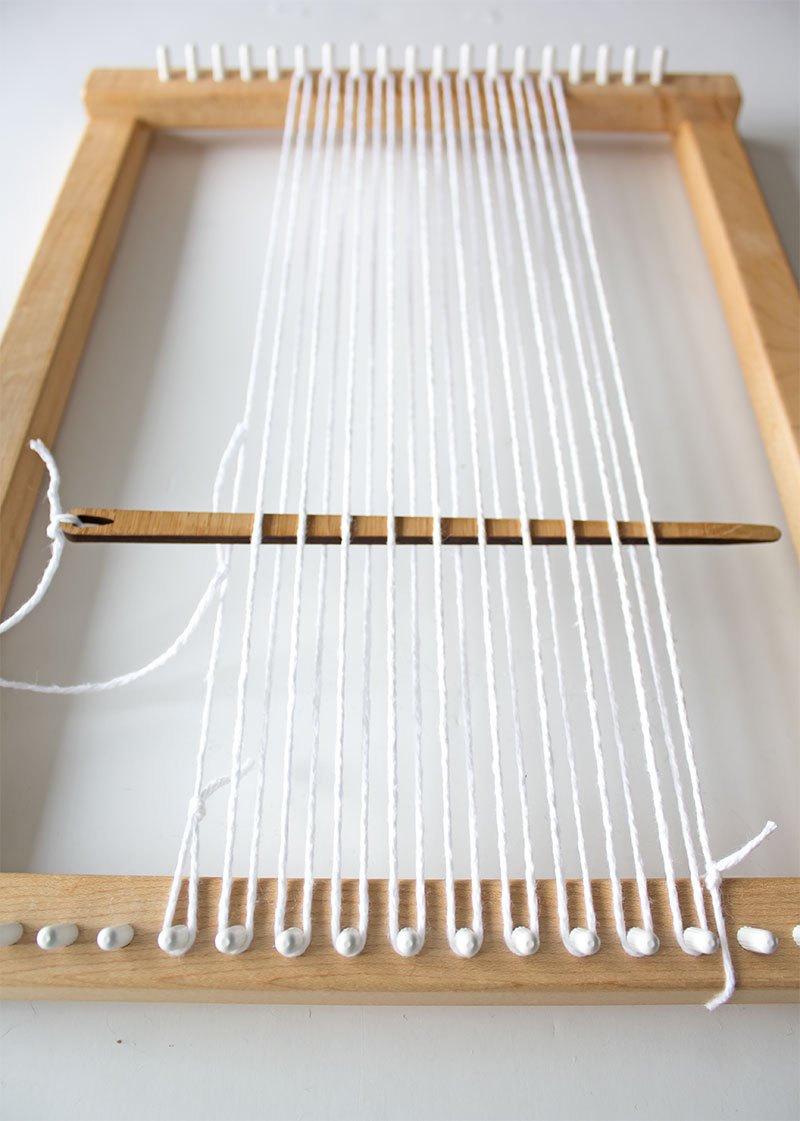
This ‘over and under’ technique is called ‘Tabby’ or ‘Plain’ weaving.
Pull the tip of the needle all the way through.
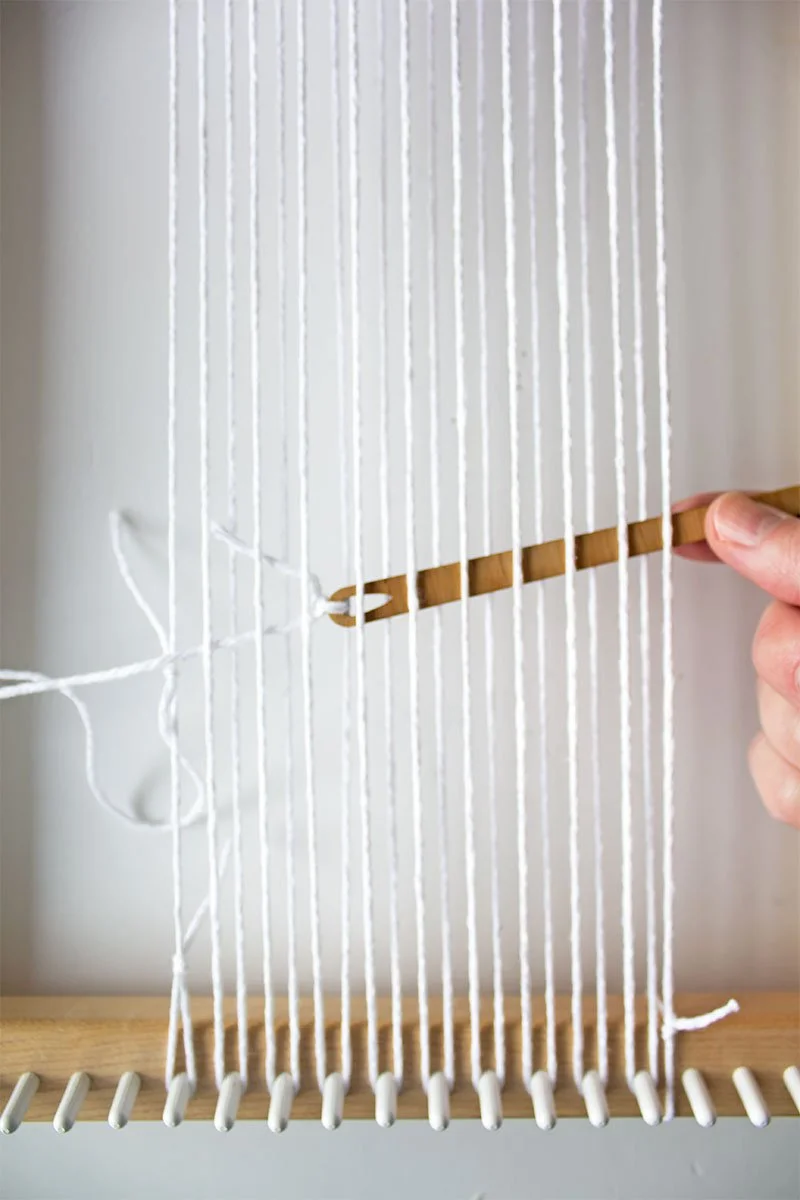
As you pull the remaining yarn all the way to the right side, instead of creating a straight horizontal row of weaving, create a gentle arc (pictured below).

Taking your finger or tapestry needle, push the middle portion down to create 2 smaller arcs so that there is an even distribution of yarn across your warp. Taking your fork (or your fingers), push the rest of the yarn down towards an imaginary line (pictured below).

You’ve just created your first row of weaving!
Why create an arc every time you weave a row?
With each subsequent row, you will notice your weaving feeling tighter. By creating an arc each time, you will create a bit of slack, thus preventing your weaving from ‘bowing’ in the middle (or looking more like an hourglass) and ensuring each row fits snuggly, thereby hiding your warp strings.
To create your second row, weave back by moving your tapestry needle over and under each strand, as before. This time, you will need to weave your yarn on the opposing side of each strand as you make your way across. (In other words, if after completing your first row, you end up over the last strand – as I did below – then begin the next row by starting under the same strand).

Continue weaving your anchor rows until you’ve run out of string - or approximately 4 rows - making sure there is at least 3-4 inches of ‘tail’ left over.

Snip off string.

NOTE: All tails created from your weaving will be taken care of at the end of the project. For now, simply leave any tails along the sides.
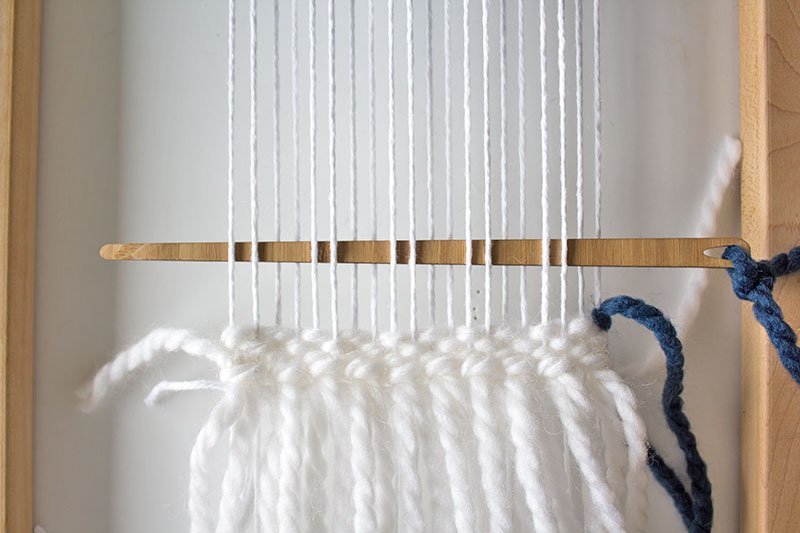
STEP 3: ADD FRINGE (Rya Knots Technique)
Cut several lengths of yarn - approximately 6-8 inches - one for every peg used to create your warp (I used 10 pegs to create my warp).

The following technique - Rya Knots - will be used to create your fringe.
You will add one knot at a time. Here is what the first knot looks like.

Here is how to recreate the Rya knot: 1. Fold yarn in half and place mid-point over 2 warp strings. 2. Wrap the yarn around both warp strings 3. Push both ends up through the middle, between the warp strings. 4. Pull to create a knot and pull down towards the woven rows below.
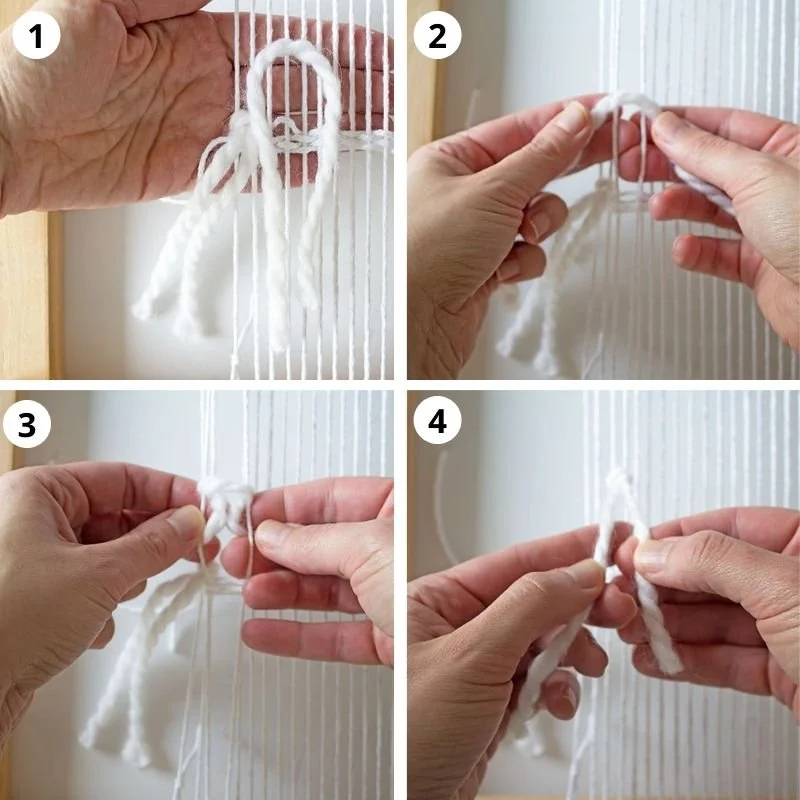
Here are both knots, side by side.

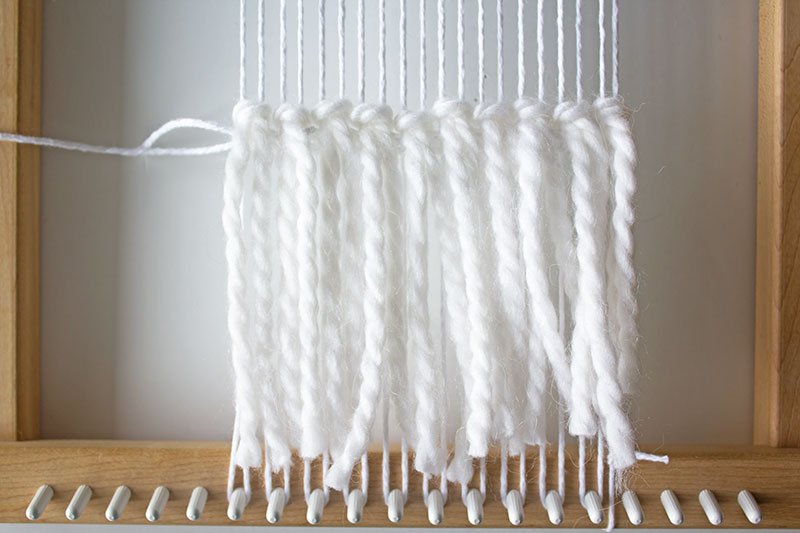
Continue creating Rya Knots across the remainder of the warp (these should now cover your anchor rows of weaving).
STEP 4: TABBY OR PLAIN WEAVE TECHNIQUE
Tabby/Plain weaving is the foundation of all weaving projects. You will use this technique more than any other.
For this particular weaving, the first series of rows are made using the ‘Tabby’ or ‘Plain’ weaving technique - the same used to create your anchor rows for your fringe.
First, cut a length of yarn, using it to loosely measure approximately 3 rows across the warp.

As before, tie one end to the first warp string on the left side.

Thread the tapestry needle and begin weaving your first row, moving over and under each subsequent warp string.

Remember to create a gentle arc, split it in two, and push the remainder down towards the row of fringe (pictured below).

Continue as before, until you run out of yarn and created 3 rows (this should leave you with about 3 inches of tail left over).

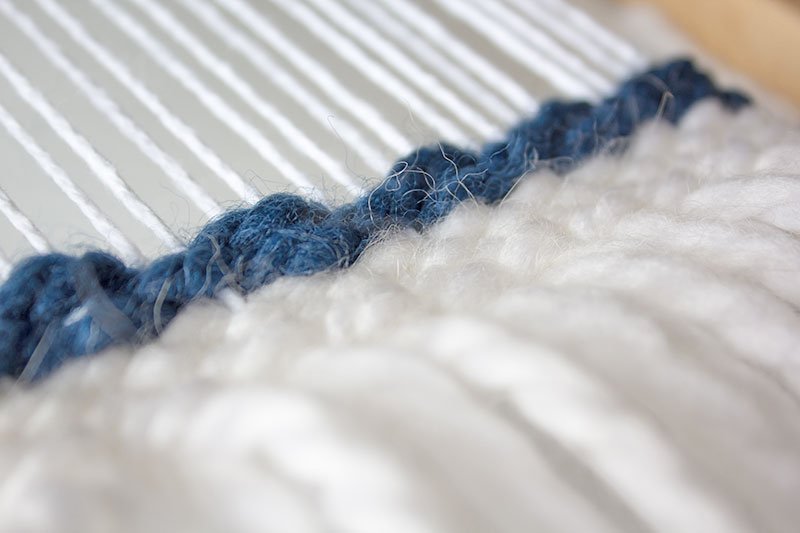
STEP 5: BASKET WEAVE TECHNIQUE
Much like the Plain or Tabby technique, the ‘Basket’ weave technique creates horizontal rows by weaving yarn over and under alternate warp strings, with one distinct difference: You will weave over and under 2 warp strings at a time, creating a more ‘textured’ look.
To begin the basket weave: As before, cut a length of yarn approximating the number of rows you wish to create; tie one end to one side of the your warp (this time, I’m starting on the right, but you can begin on the left, too); and begin weaving, taking 2 warp strings at a time.
This is what one row of basket weave should look like.

Here are 3 rows of basket weave, using blue yarn.

With basket weave, you create a more textured, raised stitch.
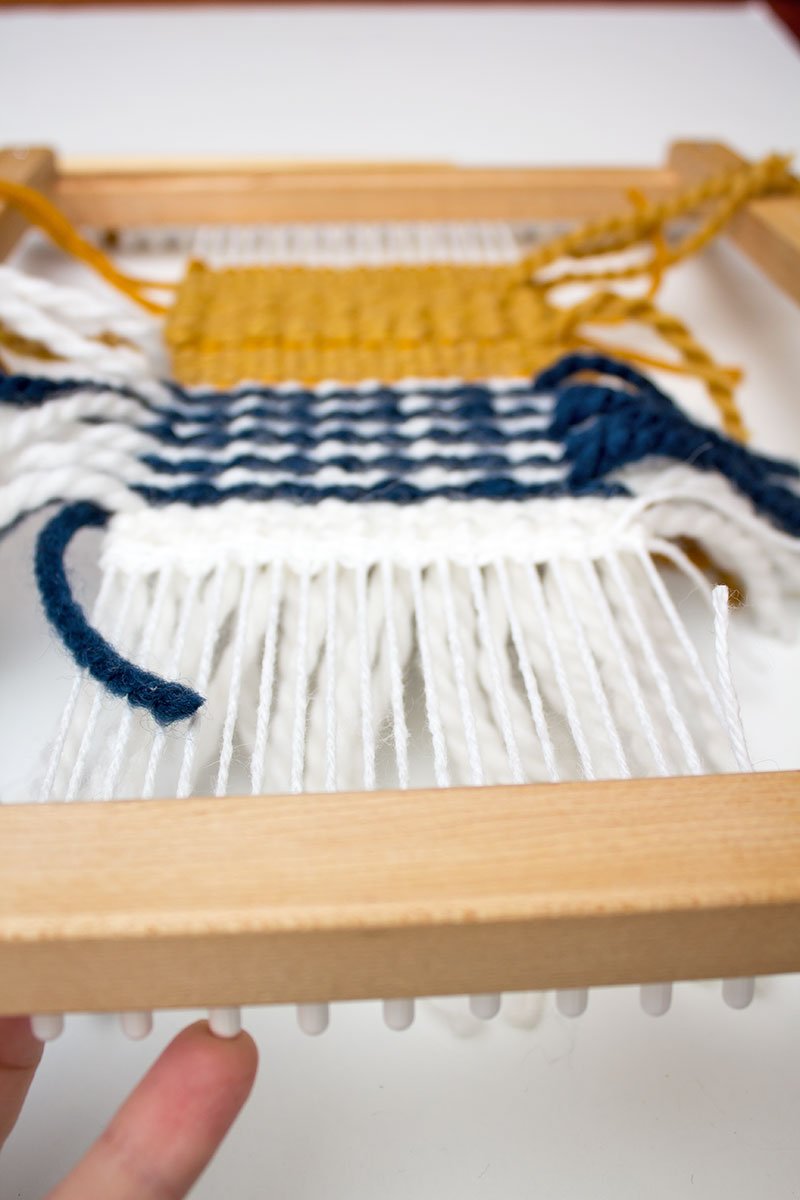
STEP 6: STRIPES
Now that you know plain/tabby weaving and basket weaving, you can create horizontal stripes by alternating colours.
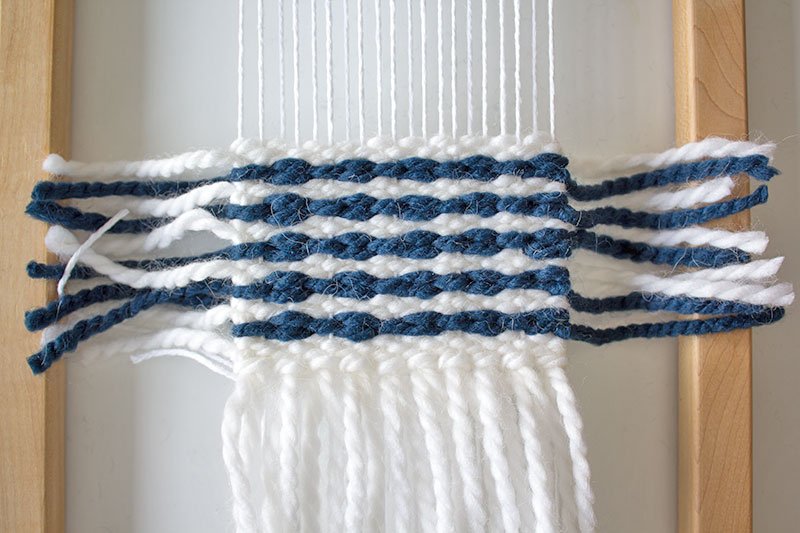
For this pattern, the blue stripes were created using basket weave; the white stripes using plain/tabby weave, 3 rows per colour:

STEP 7: SOUMAK TECHNIQUE
This is a pretty technique and is a great way to divide up portions of your weaving, giving it definition.
For every row of soumak, measure a little over 3X the width of your warp.

Tie one end to the first string of the warp.

Thread the other end to your bent-tip tapestry needle. This needle (or any small, 3-4 inch needle) is preferable when creating soumak stitches.
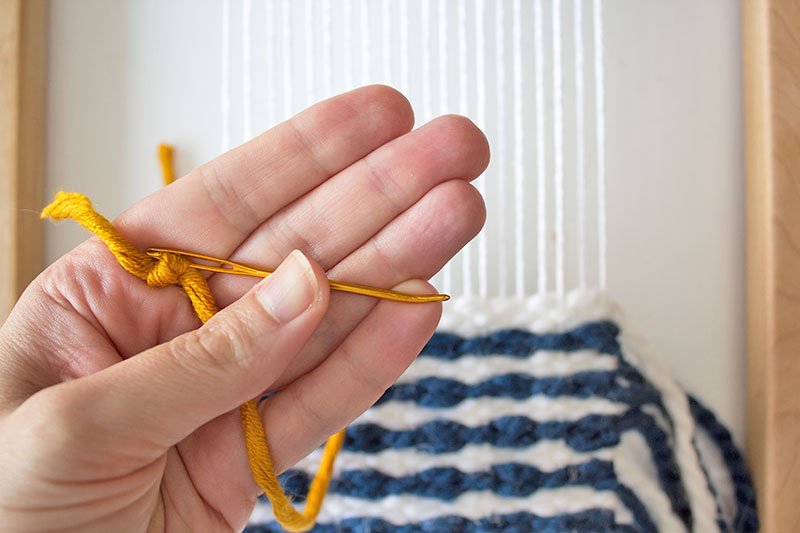
Start by pushing the tip of the needle between the first and second warp strings, pointing the tip of your needle towards the left side.
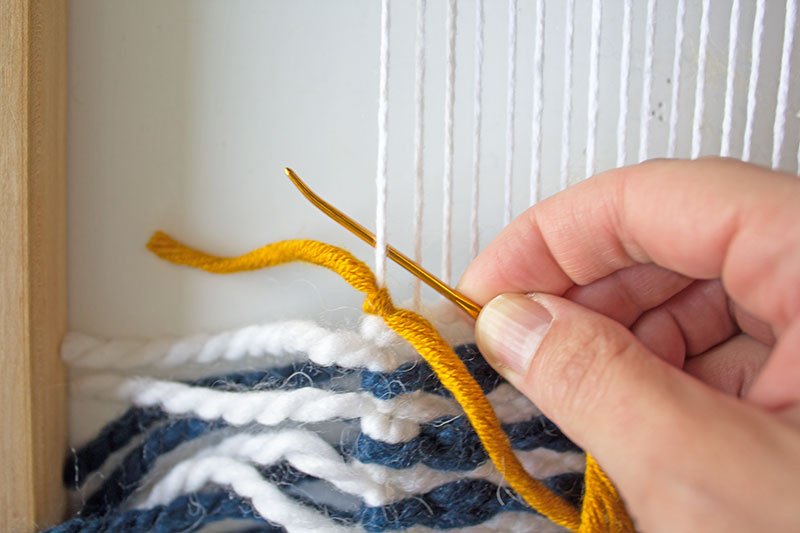
Pull the needle leftward, pulling the yarn until it’s wrapped around the first warp string.
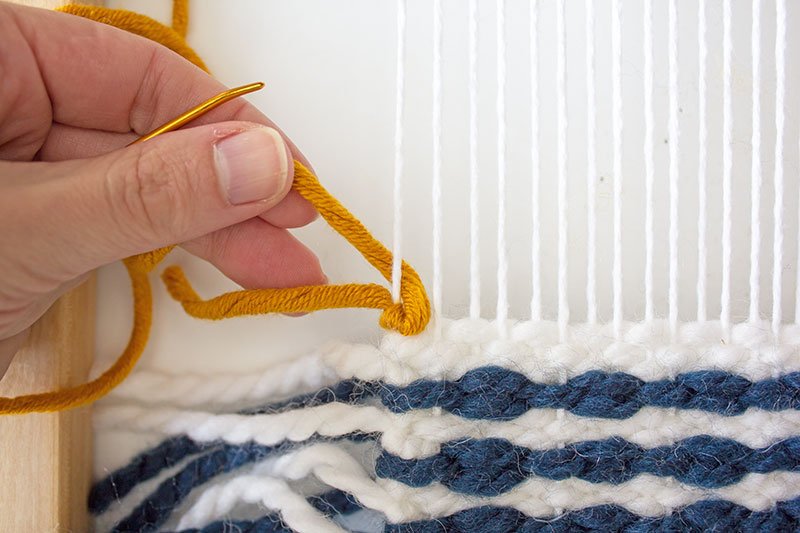
Create your second soumak stitch by guiding it between the second and third warp strings. Move the needle towards the left (and behind the second warp string).

Continue moving upwards between the second and first warp strings until the yarn is fully wrapped around the second warp string.
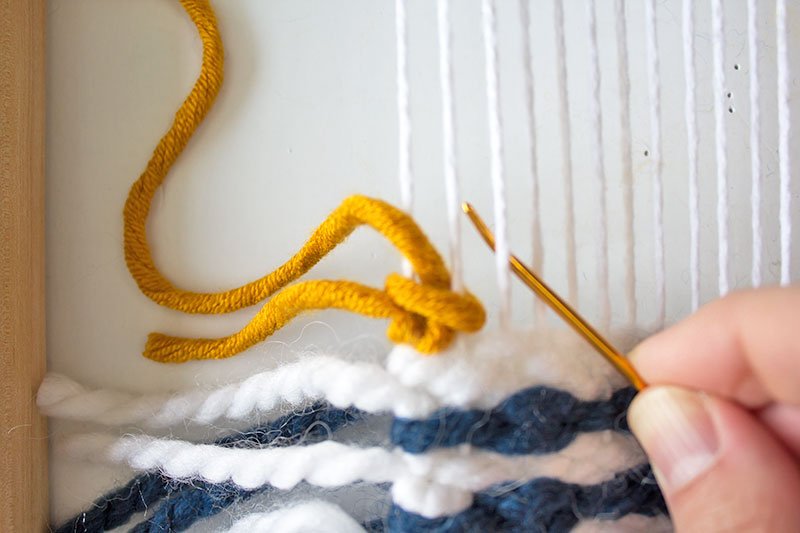
Continue creating soumak stitches until you reach the final warp string.


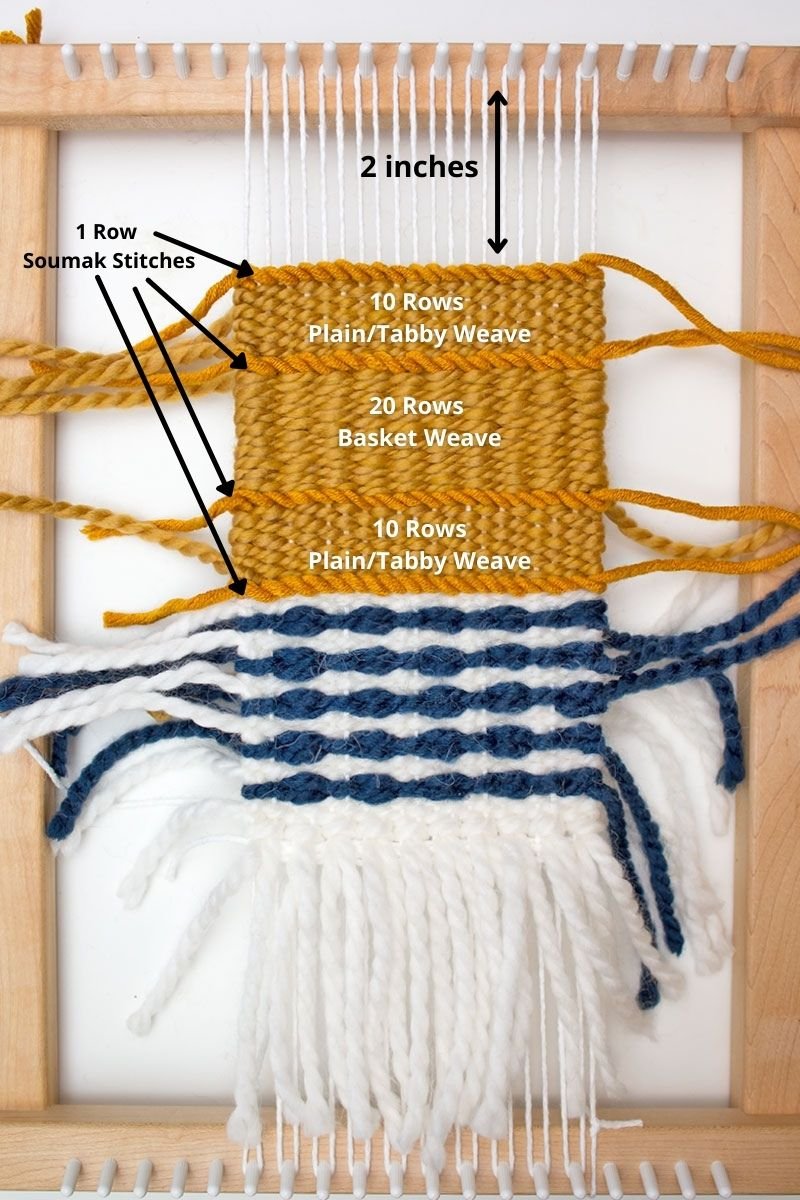
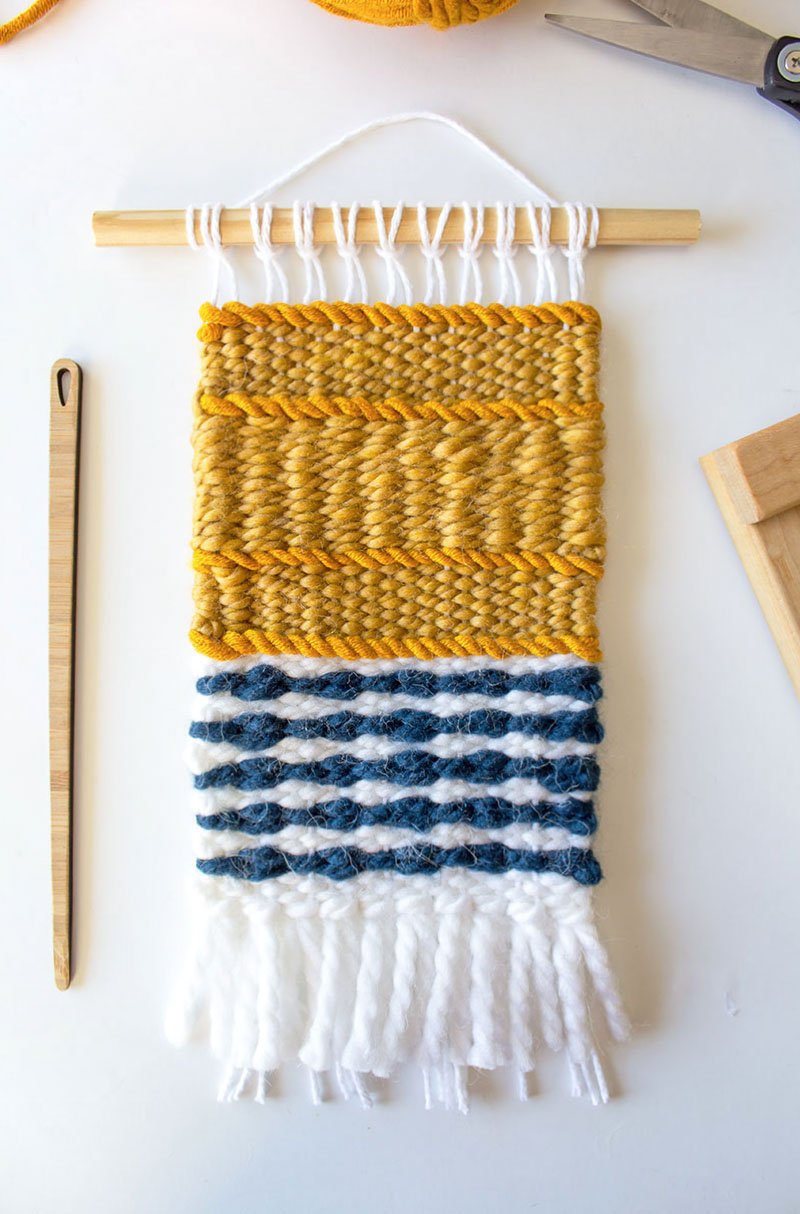
USE ALL 3 TECHNIQUES TO FINISH THE TOP PORTION
To complete the rest of your weaving, you’ll be using all 3 techniques in the following order:
10 rows of plain/tabby weave
1 row of soumak stitch
20 rows of basket weave
10 rows of plain/tabby weave
1 row of soumak stitch
You can always vary things up by creating as many or as few rows as you’d like for your design, as long as you leave 2 inches of warp along the top.
STEP 8: WEAVE IN ENDS
When you have completed your weaving, turn it over.
Now you can begin weaving all those loose into the back of the weaving, making sure to weave like colours with like. Otherwise, the colours may show through on the front.

Clip off any excess to keep it tidy.

This will take a few minutes, but once it’s done, it should look neat and tidy on the back.

STEP 9: REMOVE WEAVING FROM LOOM
Flip your loom back over, so that you are looking at the front of it again.

Remove the top portion from the loom, gently pulling the looped ends off, one peg at a time.


Remove the bottom portion from the loom, gently pulling the looped ends off, one peg at a time.

Snip off the string tied to the loom.

STEP 10: SECURE BOTTOM & TOP OF WEAVING
At this stage, the weaving will be at its most fragile, so handle with care as you secure the bottom and top end, as follows:
Secure the bottom:
To prevent the weaving from unraveling, tie a series of overhand knots (using 2 or 3 warp strings per knot) along the bottom edge of the ‘anchor’ rows of weaving.

Cut the looped ends.

Secure the top:
You can attach the top strings to a dowel in any number of ways (See “Two Quick Ways to Hang a Weaving” https://aprettyfix.com/quick-ways-to-hang-a-weaving/)
For this weaving, I’m showing you how to attach the top using a ‘lark’s head’ knot (typically used in macrame), as follows:

Continue until you reach the other side.
To make your hanger, cut a length of cotton string.

Tie a double knot to each end of the dowel and cut off the excess.

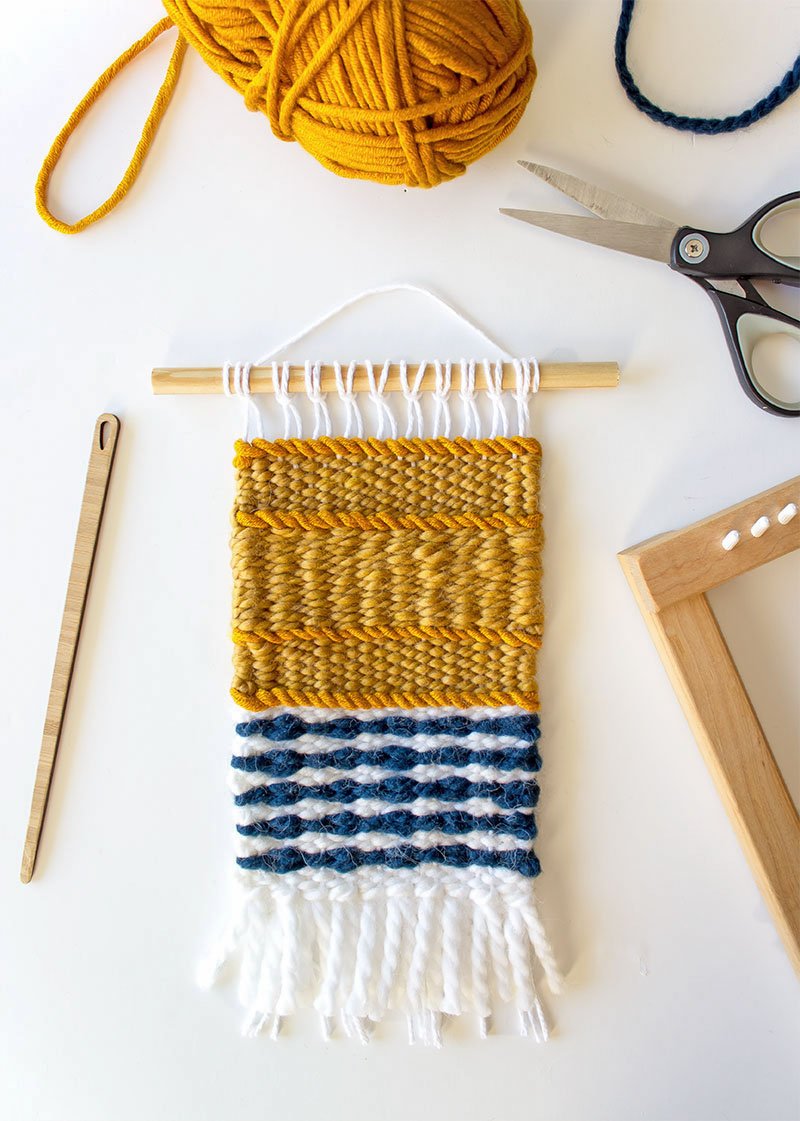
FINAL TOUCHES
Cut your fringe to whatever length you wish.

Cut the warp strings in behind, leaving a second layer to create a bit of whimsy. (If you prefer, cut the warp strings shorter than the yarn fringe itself so that it doesn’t show through).

Now your piece is ready to be displayed!


Weaving can seem intimidating when you are a beginner. Once you get the hang of the basics, a world of possibilities can open up to you.
For more weaving inspiration with step-by-step photos for a variety of weaving projects, check out some of my most popular posts below:
10 Best Weaving Tutorials from A Pretty Fix (Blog Posts)
The 6 Weaving Tools & Supplies You’ll Need To Start Weaving (YouTube video)
Happy weaving!
Jelica
Michele here - Thank you for joining us in creating your first weaving!! And thank you Jelica for this amazing tutorial!!!! I hope this has been a great start or continuation of your weaving journey, my friend. And stay tuned as there will be much more next year!!! I would love to see what you have created using this tutorial! Please comment below, tag me on social media or send me an email with your creation! I’d love to share it!!!

Hello my friend! Welcome to the Weaving Tutorial Series. Here we will be highlighting a variety of weavers who have created tutorials on a number of different weaving techniques. The weaving tutorial I’m excited about sharing with you today is all about Circular Weaving by Jelica of A Pretty Fix. She’s done some amazing tutorials (and has an interview with us as well as an amazing, simply spectacular Weaving 101 tutorial on our website as well. After the tutorial you’ll find a list of places where you can find weaving equipment as well as weavers who will inspire you with their beautiful artwork.